Table of Contents
What is Noise in Photography?
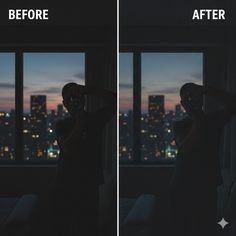
If you’ve ever taken a photo and noticed strange tiny colored dots or grainy textures in the darker parts of the image — that’s called noise.
In simple terms, noise in photography refers to unwanted visual distortion that makes an image look rough, pixelated, or dirty.
Just like background noise in music, image noise reduces the clarity and quality of your picture. It’s more visible when shooting in low light, using high ISO, or taking pictures with small sensors.
In digital photography, noise is created when the camera sensor struggles to capture enough light. As a result, it amplifies the signal — and this amplification introduces random color specks or grains.
Understanding the Science Behind Noise
To understand what causes noise, you need to know how a digital camera sensor works.
When you take a picture, light enters through the lens and hits the image sensor — usually a CMOS or CCD sensor. The sensor converts light into electrical signals.
If there’s not enough light, the camera increases the signal artificially using ISO. This process amplifies both the real signal (light) and the unwanted random signals (noise).
In short:
“Noise is the random variation of brightness or color information in an image.”
The higher the ISO setting, the higher the noise level.
That’s why professional photographers always say — “Shoot with the lowest ISO possible.”
Types of Noise in Photography
There are mainly two types of digital noise in photography:
1️⃣ Luminance Noise (Grain Noise)
This is the most common type of noise and looks like black, white, or gray grain scattered throughout the image.
It affects brightness rather than color and sometimes gives a film-like texture — which can be artistic in black-and-white photography.
Looks like: Subtle grain
Common causes: High ISO, underexposure
Fix: Use noise reduction filters in Photoshop or Lightroom.
2️⃣ Chrominance Noise (Color Noise)
This type of noise shows up as random red, green, or blue color pixels in your image — especially visible in shadows and darker areas.
Unlike luminance noise, this doesn’t look pleasant and must be corrected for professional-quality output.
Looks like: Tiny colorful dots
Common causes: Low light, long exposure
Fix: Color Noise Reduction tool in Lightroom or AI Denoise filters.
Relavent content – How to Resize a Layer in Photoshop
Why Noise Happens in Photos
There are several reasons behind image noise. Let’s break them down:
-
High ISO Settings – Increasing ISO amplifies light sensitivity, but it also boosts unwanted noise.
-
Small Image Sensors – Compact cameras and mobile phones often produce more noise than DSLRs.
-
Long Exposure Times – Longer shutter speeds can heat up the sensor, adding thermal noise.
-
Underexposure – When you brighten a dark photo in editing, hidden noise becomes visible.
-
Low Light Shooting – The sensor struggles to collect light accurately, producing noise.
-
Cheap Camera Hardware – Budget sensors handle noise reduction poorly compared to professional ones.
How to Reduce Noise in Photography (In-Camera)
If you want cleaner, smoother photos, here’s what to do before you click the shutter:
1️⃣ Use Low ISO
Stick to ISO 100 or 200 whenever possible. The lower the ISO, the less the noise.
2️⃣ Proper Lighting
Shoot in well-lit environments. Add artificial light (flash, LED, softbox) instead of boosting ISO.
3️⃣ Shoot in RAW Format
RAW files store more data, allowing for powerful noise reduction later during post-processing.
4️⃣ Use Long Exposure Noise Reduction (LENR)
Modern cameras have this built-in feature. It takes an extra shot to subtract sensor noise automatically.
5️⃣ Keep Sensor Cool
Avoid long exposures in high temperatures — heat increases sensor noise.
How to Fix Noise in Photoshop and Lightroom
After you’ve captured the photo, noise can be removed effectively using software.
In Adobe Photoshop:
-
Open your photo → Go to Filter > Noise > Reduce Noise.
-
Adjust sliders like Strength, Preserve Details, and Reduce Color Noise.
-
Use Smart Sharpen afterward to restore lost sharpness.
Pro Tip for Mac Users:
Use Command + F to reapply the last filter quickly after adjusting noise.
In Adobe Lightroom:
-
Go to Develop Module > Detail Panel.
-
Under Noise Reduction, adjust:
-
Luminance: Reduces grain
-
Color: Removes color specks
-
Detail & Contrast: Controls smoothness vs. detail
-
-
Zoom in to 100% for best results.
For Windows Users:
Use the Alt key while dragging sliders to preview the affected areas only.
AI Noise Reduction in 2025
Modern AI tools like Adobe Lightroom’s Denoise AI, Topaz DeNoise AI, and Luminar Neo use machine learning to analyze image patterns and remove noise automatically without losing sharpness.
These tools are particularly useful for:
-
Night photography
-
Astro photography
-
Wildlife and sports photography
AI tools can even restore lost details, something traditional filters can’t do.
Noise Reduction Service Price Comparison (USA vs Bangladesh vs UK)
If you want professionals to fix your noisy photos, outsourcing is an excellent option.
Here’s a comparison table:
| Country | Service Type | Average Price per Image | Turnaround Time |
|---|---|---|---|
| 🇺🇸 USA | Professional Noise Reduction | $10 – $25 | 24–48 hrs |
| 🇧🇩 Bangladesh | Outsourced Retouching (e.g., Photolixa, Grow Bangladesh) | $2 – $5 | 12–24 hrs |
| 🇬🇧 UK | Premium Retouching Studio | £8 – £20 | 24–48 hrs |
💬 Insight:
Bangladesh offers the most affordable professional editing services, maintaining high quality for eCommerce, portrait, and wedding photography clients.
When Is Noise Actually Good?
Not all noise is bad!
In creative photography, grain can add mood and vintage charm — especially in black-and-white portraits.
Photographers sometimes add grain intentionally to emulate the analog film look.
Tips to Avoid Noise in Future Shots
-
Use a tripod for long exposures instead of raising ISO.
-
Enable in-camera noise reduction features.
-
Keep firm hands or use stabilization to avoid blur plus noise.
-
Expose properly — don’t rely too much on editing.
-
Upgrade your camera if you shoot professionally — larger sensors handle noise better.
Common Myths About Noise in Photography
Myth 1: Only cheap cameras produce noise.
✅ Truth: Even high-end DSLRs can produce noise at very high ISO.
Myth 2: Noise is always bad.
✅ Truth: Some artistic photos use noise or grain for mood.
Myth 3: You can fix any noisy photo in Photoshop.
✅ Truth: Severe noise destroys details beyond recovery.
FAQ: What is Noise in Photography
1️⃣ What causes noise in photography?
Noise happens due to low light, high ISO, small sensors, or long exposures that heat up the camera.
2️⃣ How do I remove noise from photos?
Use Lightroom’s Noise Reduction, Photoshop’s Reduce Noise, or AI tools like Topaz DeNoise AI.
3️⃣ Is noise the same as film grain?
No. Grain is a natural part of analog film, while noise is an electronic error in digital sensors.
4️⃣ Can I prevent noise while shooting at night?
Yes. Use a tripod, long exposure, and low ISO instead of boosting brightness artificially.
5️⃣ Should I outsource noise reduction?
If you have large batches (eCommerce, wedding, fashion), outsourcing to Bangladesh-based editors can save 70–80% of your cost.
Conclusion: Mastering the Art of Noise-Free Photography
Understanding what noise in photography is and learning how to control it separates amateurs from professionals.
Whether you’re shooting portraits, landscapes, or products — mastering light, ISO, and post-processing will help you produce crisp, clean, and professional photos.
Modern AI tools and affordable outsourcing options make it easier than ever to get high-quality, noise-free images without investing in expensive gear.
So next time you click — remember: good lighting, smart ISO, and a little post-editing magic can make all the difference!


